
Restoring Interior Spaces After Water Damage: What Homeowners Should Know

inspecting and repairing water-damaged kitchen cabinetry

Water damage can change the appearance and condition of a home’s interior. Flooring may buckle, wall finishes can peel, and wooden cabinetry may swell after prolonged moisture exposure. Furniture, carpets, and decorative materials can also deteriorate. For homeowners, restoring these spaces involves more than repairing visible damage. It requires addressing the moisture problems that caused the deterioration.

Professional restoration may be necessary when water reaches concealed areas or damages several interior surfaces. GA Water Damage is an example of an informational and referral resource that connects Georgia homeowners with independent local restoration providers. Understanding the restoration process helps homeowners make informed decisions about repairs, materials, and interior improvements.

How Water Damage Affects Interior Materials

Different interior materials respond to moisture in different ways. Wood absorbs water and may expand, causing boards to warp or separate. Drywall can soften, while wallpaper and decorative finishes may loosen. Carpets and upholstered furniture can retain moisture long after their surfaces appear dry.

The U.S. Environmental Protection Agency (EPA) explains that moisture can support mold growth on materials such as wood, paper, and carpeting. Its guidance recommends drying water-damaged materials within 24 to 48 hours whenever possible.

The extent of damage depends on the water source, exposure time, and affected materials. A small plumbing leak may damage nearby cabinets, while flooding can affect flooring, wall insulation, and furniture throughout several rooms.

Why Moisture Assessment Must Come Before Repairs

Repainting walls or installing new flooring before the underlying structure dries can create further problems. Moisture may remain inside wall cavities, beneath flooring, or behind built-in cabinets.

The EPA identifies moisture meters as useful tools for checking water levels in building materials. These measurements help restoration professionals assess affected areas and monitor drying progress.

Before beginning cosmetic repairs, homeowners should consider several steps:

  • Identify and repair the source of water intrusion.
  • Remove standing water and materials that cannot be safely restored.
  • Check moisture levels in floors, walls, and concealed spaces.
  • Use suitable drying equipment when necessary.
  • Confirm that affected surfaces are dry before installing replacement materials.

The Centers for Disease Control and Prevention (CDC) recommends using fans and dehumidifiers when electrical conditions are safe. Contaminated floodwater and extensive mold growth may require specialized cleanup.

Once moisture problems are resolved, homeowners can begin planning repairs that restore both appearance and functionality.

Choosing Replacement Flooring After Water Damage

Flooring often requires careful evaluation because water can collect beneath its visible surface. Even materials that appear undamaged may conceal moisture in the underlayment or subfloor.

Hardwood, Laminate, and Engineered Flooring

Wood flooring can expand or distort when exposed to excessive moisture. Some boards may recover after controlled drying, while severely damaged sections may require replacement.

Laminate flooring presents additional challenges when its fiberboard core becomes saturated. Homeowners should inspect the underlying structure before installing replacement planks.

Tile and Water-Resistant Alternatives

Ceramic and porcelain tiles offer practical options for moisture-prone rooms. However, water can still enter through joints or reach the materials underneath.

Luxury vinyl flooring may also suit certain interior spaces, depending on product specifications and installation requirements.

The EPA’s water damage cleanup guidance emphasizes evaluating individual materials before deciding whether to clean, dry, or replace them.

Repairing Walls Without Hiding Moisture Problems

Water-damaged walls may develop stains, bubbling paint, or damaged plasterboard. These visible changes sometimes indicate moisture deeper inside the wall.

The EPA advises against painting over moldy surfaces. Mold must be removed, and affected areas must dry before repainting begins.

After repairs, homeowners can choose finishes that complement the original design. Neutral paint colors can help restored sections blend with surrounding walls.

For bathrooms, kitchens, and laundry areas, selecting coatings intended for humid environments may improve long-term durability.

Paint selection should follow proper surface preparation. New finishes cannot compensate for unresolved leaks or saturated building materials.

Can Water-Damaged Cabinetry Be Restored?

Kitchen and bathroom cabinets frequently experience moisture damage around sinks, plumbing connections, and flooring.

Solid wood cabinets may sometimes be restored through controlled drying, cleaning, and refinishing. However, particleboard and similar manufactured materials can lose their shape or strength after substantial water exposure.

The EPA notes that porous materials can be difficult to clean when water and mold penetrate their internal structure.

Before replacing entire cabinets, homeowners should inspect cabinet frames, doors, shelves, and surrounding walls.

If the main structure remains sound, replacing damaged doors or panels may preserve the existing layout. Severely deteriorated cabinetry generally requires more extensive repairs.

For replacement cabinets, homeowners can consider suitable sealed surfaces, moisture-resistant panels, and designs that provide access to plumbing connections.

Selecting Materials for a More Resilient Interior

Restoration presents an opportunity to reconsider materials used in moisture-prone spaces.

The goal is to balance appearance, maintenance requirements, and resistance to everyday moisture.

Practical design choices include:

  • Ceramic or porcelain flooring for bathrooms and laundry rooms.
  • Moisture-resistant wallboard where appropriate for the application.
  • Cabinet finishes designed for humid environments.
  • Washable wall coatings in areas exposed to splashes.
  • Furniture arrangements that allow access to plumbing and ventilation.

The CDC also recommends keeping indoor humidity at or below 50 percent to help limit mold growth.

No interior material is completely protected against serious flooding. Product selection should therefore complement reliable plumbing, ventilation, and moisture management.

Restoring Furniture and Decorative Features

Furniture, curtains, rugs, and decorative accessories also deserve attention during restoration.

The EPA recommends consulting qualified specialists when valuable or sentimental items require cleaning or repair.

Hard-surface furniture may be easier to clean than heavily soaked upholstered pieces. The decision depends on contamination, material composition, and drying conditions.

Homeowners should also photograph damaged belongings before disposal, particularly when preparing insurance documentation.

When selecting replacements, consider how furniture placement affects airflow, cleaning access, and everyday movement.

Designing for Long-Term Comfort and Protection

A successful interior restoration should address hidden damage before focusing on decorative improvements.

The CDC recommends promptly repairing leaks in roofs, walls, and plumbing to reduce future moisture problems. Regular maintenance and effective ventilation remain important after restoration work ends.

Homeowners can also use the opportunity to improve room layouts, replace difficult-to-maintain finishes, and choose materials suited to each space. When hiring designers or renovation contractors, checking their qualifications and previous work is equally important. Learning about verifying interior design professionals can help homeowners understand why background checks, references, and credentials matter before allowing contractors to work on their property.

Thoughtful restoration combines practical repairs with considered design choices. By addressing moisture first, homeowners can rebuild interiors that feel comfortable, function reliably, and maintain their appearance over time.
How to Make Fencing Part of a Cohesive Outdoor Design

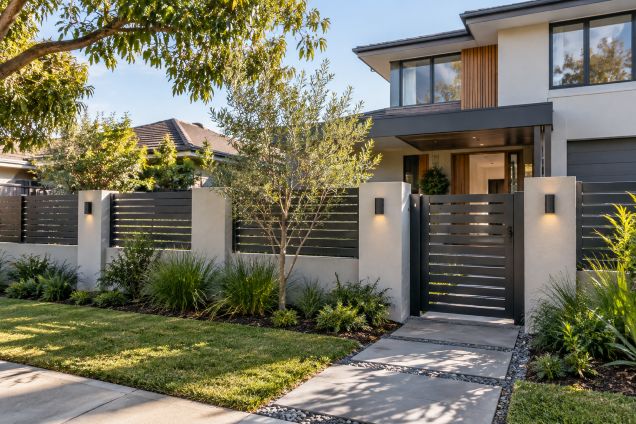
Modern Suburban Home with Slatted Gate

Outdoor spaces play a measurable role in the character and liveability of Australian homes. The NSW Department of Planning, Housing and Infrastructure notes that well-designed gardens and outdoor areas can improve comfort, privacy, sustainability and the way a property relates to its neighbourhood.

Yet the fence is sometimes treated as a separate project, chosen after the garden, paving and exterior colours have already been decided. Looking at options from My Fencing Australia can instead form part of a broader design process in which the boundary, house and landscape are considered as one visual composition.

A fence occupies a large portion of the view around many properties. Its colour, height and texture can quietly connect different elements of the exterior, or create an obvious visual break between them.

When Does a Boundary Become Part of the Design?

Picture a contemporary home with pale render, dark window frames, warm timber decking and a carefully planted garden. Add a fence with an unrelated colour and strongly contrasting style, and the boundary can suddenly become the first thing the eye notices.

The alternative is to treat fencing much like flooring or cabinetry inside a home. It does not have to match every surrounding surface. It simply needs enough visual connection to make the different elements feel intentional.

This idea extends beyond appearance. The NSW Department of Planning, Housing and Infrastructure identifies fences, walls, entries, planting and changes in level as components that shape the transition between private property and the street. Its low-rise housing design guidance also observes that boundary treatments can influence neighbourhood character and the way a development appears from public areas.

Material Sets the Visual Language

The material is often the strongest starting point. Metal fencing tends to create clean lines that can suit contemporary architecture, while timber can introduce warmth and texture. Masonry may visually connect with rendered walls, brickwork or other substantial architectural features.

Rather than choosing a material in isolation, homeowners can look at what already dominates the exterior. A house with simple geometric forms may benefit from similarly restrained fencing. A garden built around natural textures may work better when the boundary provides warmth or a softer backdrop.

Maintenance belongs in this decision as well. For example, Lysaght advises keeping steel fence panels, posts and rails clear of dirt, debris, fertilisers and other potentially corrosive material. Practical considerations such as drainage and exposure to garden products can therefore influence how a fence performs over time.

Colour Can Connect Separate Outdoor Elements

Colour does not need to be identical across the property. Repetition is often enough. A dark fence, for example, might echo window frames, exterior lighting, gate hardware or roof details without making every feature the same shade.

Neutral fencing can also work as a backdrop. Green foliage may appear more prominent against a restrained boundary, while timber furniture, stone paths and flowering plants can provide the warmer or brighter notes.

The aim is visual hierarchy. If the garden is intended to be the main attraction, the boundary can remain relatively quiet. If the gate and entrance are architectural features, stronger contrast may help define the arrival point.

How Much Height Does the Space Need?

Height changes both function and atmosphere. A tall solid fence can make a garden feel private and enclosed, while a lower or more open design can preserve views and create a stronger connection with the street.

Local rules also matter. In New South Wales, for example, specific standards apply to fence heights under exempt and complying development provisions, with requirements varying by location, zoning and site conditions. The NSW Department of Planning, Housing and Infrastructure advises homeowners to check applicable planning controls and local council requirements before proceeding.

Design therefore involves finding a balance between privacy, openness and compliance rather than automatically selecting the tallest possible boundary.

Can Landscaping Soften a Strong Fence Line?

Plants can change how a fence is perceived. Instead of appearing as a hard edge around the property, the boundary can become a background layer behind shrubs, grasses, climbing plants and small trees.

The NSW Department of Planning, Housing and Infrastructure describes trees as natural privacy screens and recommends considering aesthetics as well as screening performance. It also suggests mixed planting because variety can create a more visually interesting landscape while supporting biodiversity.

This approach can be especially useful where privacy requires a relatively solid fence. Layered planting introduces depth and breaks up a long uninterrupted surface.

Gates Deserve Their Own Design Conversation

A gate is more than an opening in the boundary. It often marks the transition from the street to the home, making it one of the most noticeable elements in a front garden. Coordinating the entrance with pathways, planting and exterior lighting can strengthen this effect, and the principles behind designing a good lighting system can also help when considering how illumination, mood and visual emphasis contribute to the overall exterior design.

Repeating the fence material can create continuity, while a contrasting gate can establish a deliberate focal point. Hardware, posts, paths and nearby planting can then reinforce the entrance rather than leaving it visually disconnected.

Safety and visibility deserve consideration too. YourHome, an Australian Government resource, recommends clearly defining property boundaries while considering lower or more open fences where appropriate to improve observation and sunlight.

What Makes the Whole Exterior Feel Intentional?

Cohesion rarely comes from matching everything. It usually develops through repeated relationships: a fence colour that appears elsewhere, a gate aligned with a path, planting that softens the boundary, or materials that share similar visual weight.

Site conditions should guide those choices. NSW Planning recommends considering features such as sunlight, existing trees, neighbouring properties, privacy, drainage, slope and streetscape character during site analysis.

Seen this way, fencing becomes one layer of a larger outdoor composition. The most successful boundary may be the one people notice least as an isolated object because it seems to belong naturally with the architecture, garden and spaces around it.

How Acoustic Wall Treatments Can Add Texture Without Overwhelming a Room

light oak slatted acoustic feature wall

Texture gives an interior depth by changing how surfaces interact with light, colour, and surrounding materials. This can be especially useful in contemporary rooms filled with smooth plaster, glass, polished furniture, and hard flooring. These surfaces create a clean appearance, but they also reflect sound rather than absorbing much of it. Acoustic treatments can address some of those reflections while introducing another visual layer to the room.

Decorative acoustic products are increasingly designed to work as visible interior finishes rather than purely technical additions. QuietWalls, for example, offers slatted and decorative wall panels in finishes including walnut, smoked oak, light oak, white, and stone-effect designs. Its product range shows how acoustic treatment can become part of a room’s material palette instead of looking like specialist sound equipment.

Why Hard Interiors Can Benefit From Softer Surfaces

Sound behaves differently depending on the surfaces it encounters. Hard materials such as glass, concrete, and plaster tend to reflect more sound energy back into a room. Absorptive materials reduce some of these reflections. Guidance from the Occupational Safety and Health Administration identifies sound-absorbing materials as one method of reducing reflected noise within enclosed spaces.

This matters in living rooms, dining areas, offices, and other spaces where speech clarity is important. Adding absorption does not make a wall soundproof. Soundproofing is concerned with limiting sound transmission between spaces, while acoustic treatment mainly manages sound behaviour within the room.

For interior design, this creates an opportunity. A wall that needs acoustic treatment can also become a source of visual texture. The key is deciding how much texture the room actually needs.

Timber Tones Change the Visual Weight

Wood and wood-look finishes introduce visible grain, variation, and warmth. Research indexed by the National Library of Medicine has also examined how wood and other natural materials influence people’s experience of indoor environments, including their visual and sensory qualities.

However, different timber tones can produce very different design effects. Light oak can sit quietly beside pale flooring, cream upholstery, and neutral paint. Walnut or smoked oak creates stronger contrast and may become a more obvious focal point.

Existing finishes should therefore guide the choice. A room already containing dark cabinetry, patterned fabrics, and strong artwork may benefit from a quieter wall treatment. A simpler room can usually accommodate a more noticeable timber finish without feeling crowded.

Panel Proportions Affect How the Wall Feels

Texture is influenced by scale as much as colour. Narrow vertical slats create repeated lines that lead the eye upward. Wider decorative patterns can appear heavier because each section occupies more visual space.

The direction matters too. Vertical panels can emphasise height, while horizontal arrangements can draw attention across the width of a wall. Full-height installations usually have greater visual impact than smaller sections behind a television, desk, dining bench, or bed.

This means acoustic treatment does not have to cover every available surface. A defined area can introduce enough variation to break up a plain wall while leaving surrounding surfaces visually calm.

Lighting Can Make Texture More Noticeable

Slatted surfaces respond strongly to light because their raised and recessed areas create small shadows. Light arriving from the side tends to emphasise this relief. More even frontal lighting can make the same wall appear flatter and less dramatic.

Natural light also changes throughout the day. Before selecting a dark or strongly textured finish, it helps to view samples under both daylight and artificial lighting. A finish that appears subtle in bright daylight may look much deeper under warm evening lights.

Lighting should therefore be considered alongside the wall treatment rather than after installation. The goal is usually to reveal the texture without making every groove or edge compete for attention.

Furniture and Fabrics Help Create Balance

Wall panels are only one part of a room’s acoustic and visual character. Rugs, upholstered furniture, curtains, and other soft materials can absorb sound while adding their own textures. This allows the wall treatment to share the job rather than carry the entire design.

Balance becomes particularly important in open-plan rooms. If the feature wall has strong grain and repeated slats, nearby furniture can remain relatively simple. Similar principles apply when designing statement walls, where patterns, surrounding décor, and layering need to work together rather than compete for attention. Plain upholstery and restrained accessories can then give the eye somewhere to rest.

Material repetition can also connect the treatment to the wider room. A timber tone echoed subtly in a coffee table, shelving unit, or chair leg can make the wall feel intentional. Exact matching is unnecessary. Similar undertones are often enough to create continuity.

How Do You Keep a Feature Wall From Taking Over?

Start with the room rather than the panel. Look at existing colours, flooring, furniture, daylight, and the main viewing angles. Then decide where additional texture will contribute something useful.

It also helps to consider the acoustic problem first. Treating relevant reflection areas can be more purposeful than covering a wall simply because it is empty. The Acoustical Society of America explains that reverberation is shaped by both room characteristics and sound absorption, so the amount and placement of absorptive material matter.

Finally, leave some visual breathing room. Plain painted walls can make a textured section more effective because contrast allows the material to stand out without spreading across every surface.

A successful acoustic feature wall should feel connected to the rest of the interior. Timber tone, scale, lighting, furniture, and surrounding materials all influence that result. When these elements are considered together, acoustic wall treatments can bring depth and rhythm to a room while keeping the overall design calm and balanced.

How integrated lighting strategies are changing the way residential interiors are planned

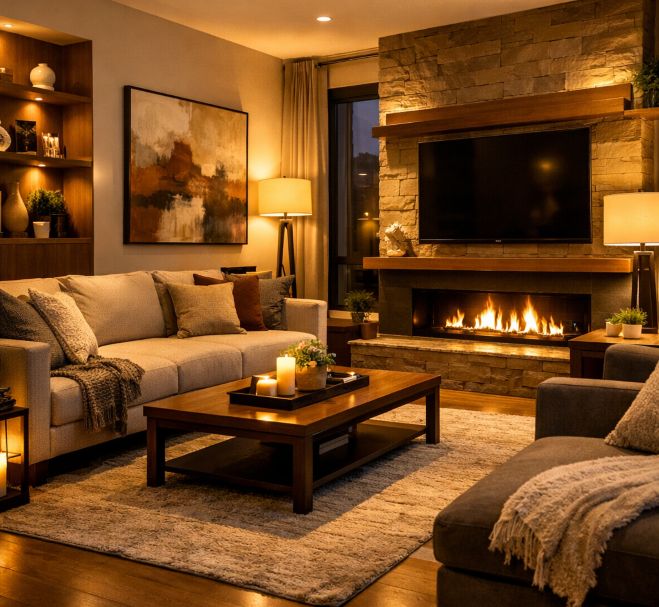
warm living room with good lightingg

Residential lighting can account for a large share of household electricity consumption, especially in homes that rely heavily on outdated fixtures and poorly distributed illumination. The U.S. Department of Energy notes that lighting efficiency improvements, including LED adoption and smart controls, have significantly reduced energy use in modern homes. Yet, despite technological advances, many residential interiors still struggle with uneven brightness, wasted energy, and disconnected design planning.

These challenges are increasingly addressed through integrated design approaches where electrical systems and interior planning are developed together from the beginning. Insights from D&D Electric, a specialist in energy and electrical system planning, highlight how early coordination between lighting layout and architectural intent helps prevent costly redesigns later. This approach is becoming more relevant as homeowners and designers prioritize both functionality and long-term efficiency in interior spaces.

Common lighting design issues in residential interiors

Despite improvements in lighting technology, many homes still suffer from design oversights that affect comfort and usability. One of the most common issues is inconsistent illumination, where some areas are over-lit while others remain too dim. This often happens when lighting is treated as a finishing touch rather than an integrated design element.

Another frequent problem is overreliance on a single light source per room. Ceiling fixtures alone rarely provide balanced lighting for tasks, ambiance, and safety. The Illuminating Engineering Society (IES) emphasizes layered lighting, combining ambient, task, and accent sources to create functional visual environments. When this principle is ignored, rooms can feel flat or visually tiring.

Energy inefficiency is also a concern. Older homes or poorly planned renovations may use outdated wiring layouts that do not support modern LED systems or smart dimming controls. Research from the U.S. Department of Energy shows that LED lighting can reduce energy consumption by up to 75 percent compared to traditional incandescent bulbs, yet improper installation limits these benefits.

The role of integrated electrical planning

Integrated electrical planning addresses lighting as part of the architectural framework rather than an afterthought. This means that electrical layouts, fixture placements, and control systems are designed alongside spatial planning, not added once construction is complete.

This coordinated method allows lighting designers, architects, and electrical professionals to align on key decisions early. It ensures that wiring routes support intended lighting zones, switch locations match user behavior, and fixtures complement interior proportions. In modern residential projects, this collaboration often includes electrical engineers or licensed contractors who specialize in system-level planning rather than isolated installations.

When executed properly, integrated planning reduces the risk of retrofitting, which can be both expensive and disruptive. It also supports future adaptability, allowing homeowners to upgrade to smart lighting systems without major structural changes. The American Society of Heating, Refrigerating and Air-Conditioning Engineers (ASHRAE) highlights that coordinated building systems improve overall energy performance by reducing inefficiencies caused by disconnected design decisions.

How coordinated systems influence ambiance, efficiency, and usability

A well-planned lighting system does more than illuminate a space. It shapes how a home feels and functions. Integrated lighting strategies allow for better control of ambiance through zoning, dimming, and layered lighting design. This means a living room can shift from bright and functional during the day to soft and relaxed in the evening with minimal adjustments.

Efficiency also improves significantly. When lighting circuits are mapped according to room usage and natural light availability, energy waste is reduced. For example, placing task lighting near work surfaces and using sensors in low-traffic areas ensures that electricity is used only when needed. These systems align with broader sustainability goals promoted by organizations such as the International Energy Agency, which encourages smarter energy use in residential buildings.

Usability is another key benefit. Integrated systems allow homeowners to control lighting through centralized switches, mobile apps, or voice-activated platforms. This improves accessibility, especially in larger homes or multi-level spaces where manual control can become inconvenient. Thoughtful coordination between electrical layout and interior design ensures that these controls are intuitive rather than complicated.

Practical considerations for homeowners and designers

For homeowners planning renovations or new builds, early collaboration with electrical professionals is essential. Lighting decisions should be made alongside floor plans, furniture layouts, and material selection. This prevents common issues such as misplaced fixtures or insufficient outlet placement.

Designers are also encouraged to consider natural light sources when developing lighting schemes. Positioning artificial lighting in relation to windows can reduce daytime energy consumption and improve visual comfort. In addition, selecting adaptable systems, such as dimmable LEDs and programmable controls, allows spaces to evolve with changing needs.

Another important consideration is maintenance and scalability. Integrated systems should be designed with accessibility in mind, ensuring that future upgrades or repairs do not require major reconstruction. This long-term perspective reflects a shift in residential design toward flexibility and sustainability.

READ ALSO: From Infrastructure to Interiors: How Structural Materials Influence Modern Industrial Style Home Design

Conclusion

Lighting in residential interiors is no longer treated as a simple utility. It has become a core design component that influences comfort, efficiency, and spatial experience. Integrated lighting strategies demonstrate how thoughtful coordination between design and electrical planning can transform ordinary spaces into adaptable and energy-conscious environments.

As more homeowners adopt layered lighting systems and smart controls, the role of coordinated electrical expertise becomes even more important. Electrical planning professionals and design consultants increasingly work together to ensure that lighting supports both aesthetic goals and functional needs. This shift reflects a broader movement toward holistic interior design, where systems are interconnected rather than isolated, and where efficiency and livability are planned from the very beginning.

Ultimately, the future of residential interiors depends on how well lighting, architecture, and electrical systems are aligned. When these elements work together, homes become more responsive, more efficient, and more comfortable for everyday living.

How Radiator Furniture Transforms Modern Irish Homes

Here is a fact: A 2023 survey by the Irish Interior Design Association found that over 60% of homeowners felt radiators disrupted the visual flow of their living spaces. Despite their functional importance, radiators often appear bulky and outdated, clashing with contemporary design schemes. These challenges underscore the growing demand for creative solutions that merge practicality with aesthetics.

One such solution is Radiator Furniture, which has become a trusted source for homeowners seeking to integrate heating systems seamlessly into their interiors. By reimagining radiator covers as stylish furniture pieces, Irish households are discovering new ways to elevate their spaces without compromising warmth or efficiency.

Case Study 1: Hallway Transformation with Slim Covers

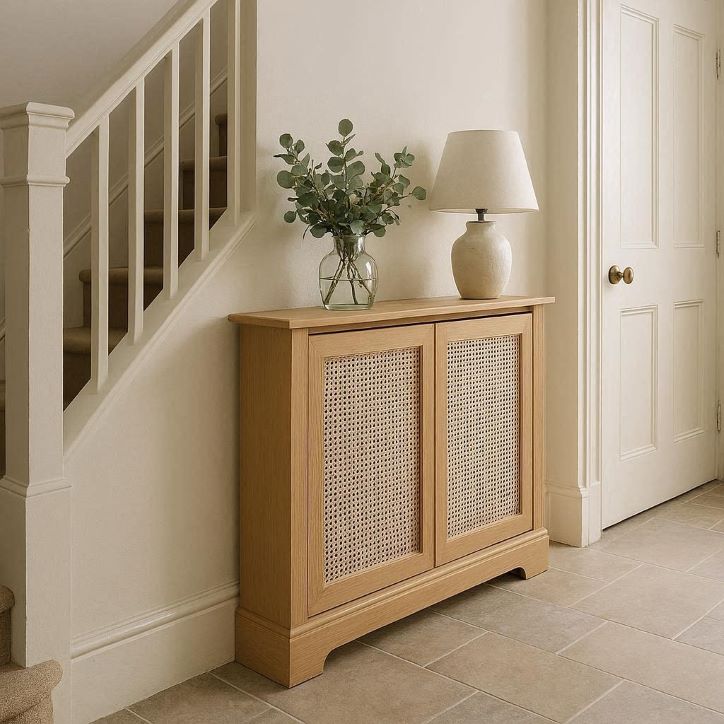
slim radiator cabinet in a hallway

Hallways are often the first impression of a home, yet radiators placed along narrow corridors can feel intrusive. In Dublin, a young couple renovating their Victorian terrace faced this exact challenge. Their hallway was cluttered by a protruding radiator that restricted movement and diminished the elegance of the entryway.

The solution came in the form of a slimline radiator cover designed to hug the wall. According to House Beautiful Ireland, compact covers are particularly effective in tight spaces, as they reduce visual bulk while maintaining airflow. Once installed, the hallway immediately felt more spacious. The cover’s clean lines created a sense of order, while its neutral finish blended with the couple’s minimalist décor.

The benefits extended beyond aesthetics. The flat top of the cover provided a functional surface for keys, mail, and a small vase of fresh flowers. What was once a disruptive element became a practical and stylish feature, setting a welcoming tone for guests.

Case Study 2: Living Room Upgrade with Oak Finishes

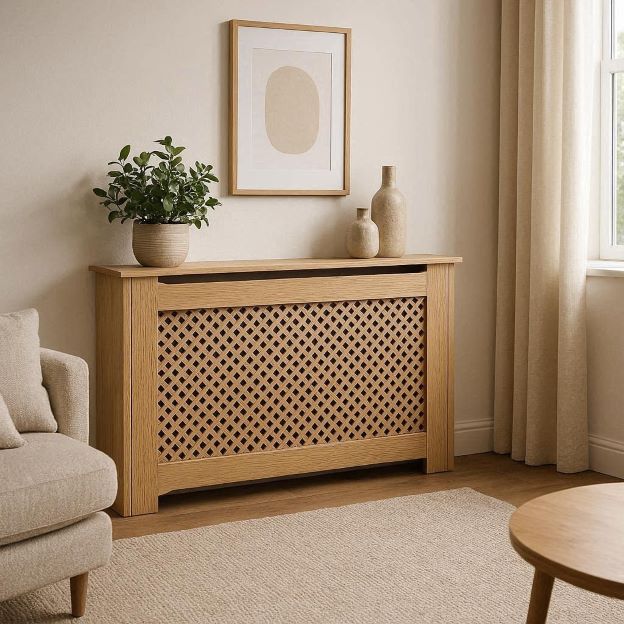
Living room with oak radiator cabinet

Living rooms are the heart of Irish homes, yet radiators often sit awkwardly beneath windows, interrupting the symmetry of furniture arrangements. In Cork, a family sought to modernize their living room while preserving its warmth and character. Their solution was a bespoke oak-finished radiator cabinet that doubled as a console table.

Research from The National Association of Home Builders highlights that natural wood finishes remain among the most desired interior materials, valued for their timeless appeal and durability. By choosing oak, the family introduced a warm, organic texture that complemented their existing furniture. The radiator cabinet became a focal point, harmonizing with the room’s palette while concealing the utilitarian radiator beneath.

Functionality was equally important. The cabinet’s design allowed heat to circulate efficiently, while its surface provided space for framed photographs and decorative lamps. The transformation elevated the room’s ambiance, proving that radiator cabinetry can serve both practical and aesthetic purposes.

Expert Tip: Styling Radiator Tops with Décor

Interior designers often emphasize the importance of layering décor to create depth and personality. Radiator covers, with their flat tops, offer an overlooked opportunity for styling. Experts note that these surfaces can be treated like console tables, ideal for seasonal displays or everyday essentials. Beyond styling, professionals also highlight the importance of background checks in interior design projects, ensuring that every design choice is supported by reliable craftsmanship and ethical standards.

  • Greenery: Potted plants or succulents add freshness and soften the lines of radiator cabinetry.
  • Artwork: Small framed prints or leaning canvases introduce visual interest without overwhelming the space.
  • Lighting: Table lamps create warmth and highlight the furniture’s craftsmanship.
  • Seasonal accents: Candles in winter or seashells in summer allow homeowners to refresh their interiors effortlessly.

According to Better Homes & Gardens, layering décor on functional furniture pieces helps integrate them into the broader design scheme, ensuring they feel intentional rather than improvised.

Conclusion: Radiator Furniture as a Design Staple

The evolution of radiator cabinetry demonstrates how design can solve everyday challenges. From slim hallway covers that maximize space to oak-finished cabinets that elevate living rooms, these solutions prove that heating systems need not compromise style. By embracing radiator enclosures, Irish homeowners are turning functional necessities into design assets.

As modern interiors continue to prioritize cohesion and elegance, radiator cabinetry is emerging as a staple of thoughtful design. Whether described as radiator cabinets, heating enclosures, or radiator covers, these pieces embody the balance of utility and beauty. They transform radiators from disruptive elements into integral features, ensuring that warmth and style coexist seamlessly in contemporary Irish homes.